How to Upload a Table to a Website
Every bit developers, we're always asked to do more for our users. They want their Web pages faster, smaller, and with more features. This means that you have to commencement working more in JavaScript and jQuery on the client-side. Past doing more customer-side coding, yous reduce post-backs to the server, thereby increasing performance. In this get-go article of a series on working inside HTML and the Web API, I'll prove you how to add, edit, and delete data in an HTML table using JavaScript and jQuery, but no post-backs. In subsequent manufactures, you'll acquire how to accept that information and use the Spider web API to recollect and alter this information.
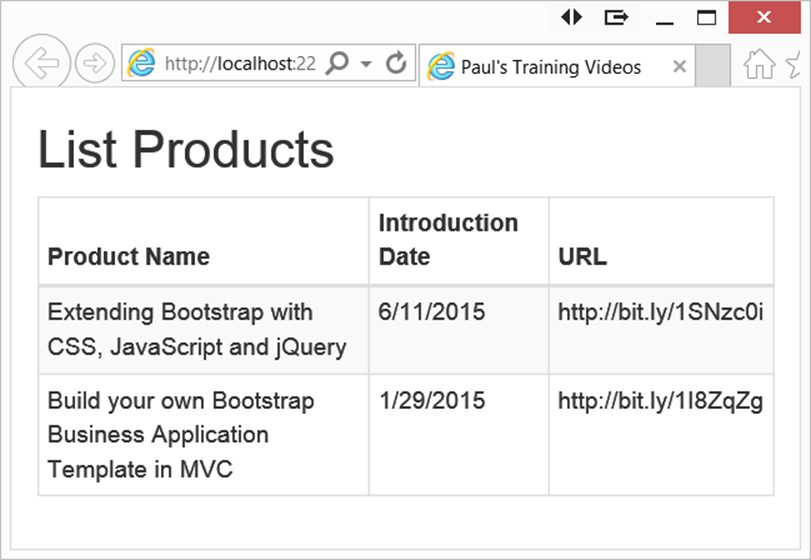
To demonstrate the concepts for this article, I created a folio called Paul'southward Training Videos (Figure 1). This page allows me to listing all of my training videos on Pluralsight, and somewhen, to add together, edit, and delete them. I'm using Bootstrap in order to have a nice appearance for my Web page, but it's not required.
Add a Production
The HTML page I use to illustrate these concepts is shown in Listing 1. This HTML creates an empty table with a <thead> for the headers of each cavalcade in the table. At that place are 3 columns: product name, introduction appointment, and URL. Note that there's no <tbody> for this table. I've left the <tbody> element off on purpose to illustrate how y'all check for that in jQuery, and add the <tbody> element, if necessary.
Add Product Rows to the Table
At the lesser of this HTML page, I created a <script> tag with a function chosen productsAdd(). This function uses the append() method to add a <tr> with the appropriate number of <td> tags to course a row for your table. Employ a jQuery selector to locate the ID attribute of your table and the <tbody> tag, and append a <tr> and the <td> tags as shown in the following code snippet.
function productsAdd() { $("#productTable tbody").append("<tr>" + "<td>My Starting time Video</td>" + "<td>six/11/2015</td>" + "<td>www.pluralsight.com</td>" + "</tr>"); } The HTML shown in Listing i didn't include a <tbody> tag within the table. If yous run the code shown in the snippet above, no rows are appended to your table because the result of the selector $("productTable tbody") comes back as null. You should ever accept a <tbody> in all of your tables. If you don't, it's no trouble because you can add one programmatically. Modify the code shown to a higher place to bank check to see if the selector of your table ID and the <tbody> returns something. If it doesn't, append a <tbody> tag to the table prior to calling the append() with the rows you wish to add together. You do this with the following code.
if ($("#productTable tbody").length == 0) { $("#productTable").suspend("<tbody></tbody>"); } List one: HTML Table Markup
<div course="container"> <div course="row"> <div course="col-sm-6"> <h2>List Products</h2> </div> </div> <div class="row"> <div class="col-sm-6"> <tabular array id="productTable" class="table table-bordered table-condensed table-striped"> <thead> <tr> <th>Production Proper noun</th> <th>Introduction Date</thursday> <th>URL</th> </tr> </thead> </tabular array> </div> </div> </div> The complete method to add a couple of rows to the HTML tabular array is shown in List 2
Listing 2: JavaScript function to add rows to an HTML table
<script> // Add together products to <tabular array> function productsAdd() { // First cheque if a <tbody> tag exists, add one if non if ($("#productTable tbody").length == 0) { $("#productTable").append("<tbody></tbody>"); } // Append product to the table $("#productTable tbody").append("<tr>" + "<td>Extending Bootstrap with CSS, JavaScript and jQuery</td>" + "<td>half-dozen/11/2015</td>" + "<td>http://scrap.ly/1SNzc0i</td>" + "</tr>"); $("#productTable tbody").append("<tr>" + "<td>Build your own Bootstrap Business Application Template in MVC</td>" + "<td>one/29/2015</td>" + "<td>http://scrap.ly/1I8ZqZg</td>" + "</tr>"); } </script> You lot tin can telephone call the to a higher place part when the document is loaded past calculation the jQuery certificate.set function simply earlier the ending </script> tag.
$(document).ready(office () { productsAdd(); }); Add Rows Dynamically
Let's brand the page a footling more dynamic by gathering the product data from the user and adding that data to the table. Add together three input fields for the user to input information to add to the product table. The user enters a product name, introduction date, and the URL of the video, as shown in Figure 2. Later entering the data into these fields, that information is retrieved from the input fields and added to a new row in the HTML table.
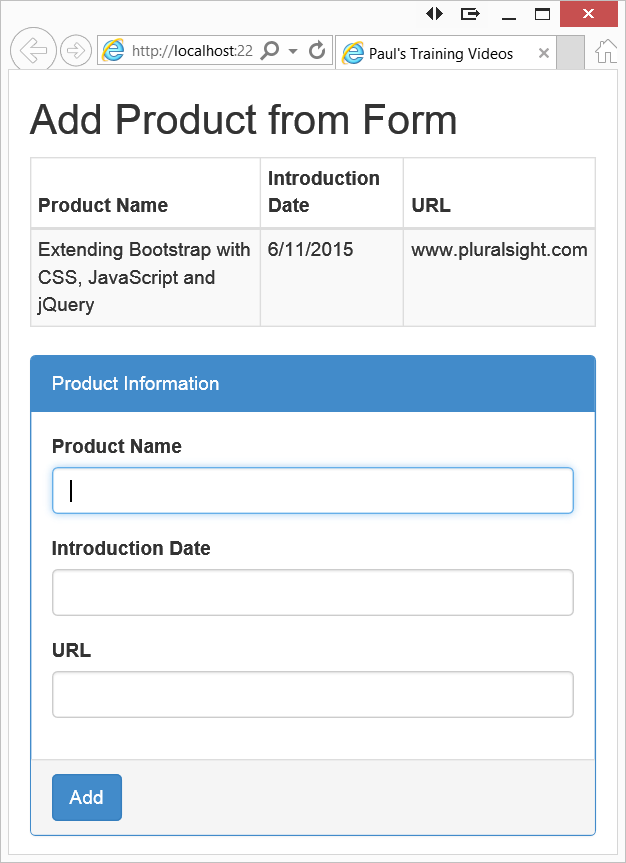
In addition to the new input fields, a <button> is added that when clicked, adds the information from the fields into the table. This push, shown at the bottom of Figure 2, is a normal HTML button with a function named productUpdate called from its onclick effect.
<push button type="button" id="updateButton" grade="btn btn-master" onclick="productUpdate();">Add</button> Add a Row from the Input Fields
Once the user adds the data in the input field, they click on the Add push button. In response to this click event, the productUpdate() part is called, every bit shown in the following lawmaking snippet.
function productUpdate() { if ($("#productname").val() != null && $("#productname").val() != '') { // Add product to Table productAddToTable(); // Clear form fields formClear(); // Focus to product name field $("#productname").focus(); } } If the Product Proper name field is filled in with some information, then the productAddToTable function is called to build the new row for the table. Once this function is run, formClear() is chosen to clear the input fields to set up for the next row to be added. Finally, input focus is given to the Product Name Input field.
The productAddToTable() part, shown in List 3, is like to the lawmaking I wrote earlier when I hard-coded the values. The departure in this method is that information technology uses jQuery to retrieve the values from the text boxes and build the <td> elements from those values.
List 3: Retrieve values from input fields and build a row for a table
function productAddToTable() { // First check if a <tbody> tag exists, add ane if not if ($("#productTable tbody").length == 0) { $("#productTable").suspend("<tbody></tbody>"); } // Append product to the table $("#productTable tbody").append("<tr>" + "<td>" + $("#productname").val() + "</td>" + "<td>" + $("#introdate").val() + "</td>" + "<td>" + $("#url").val() + "</td>" + "</tr>"); } The formClear() function uses a jQuery selector to find each input field and prepare the value of each to a blank string. Setting the value to a blank clears the input field and then that the user can enter new data.
function formClear() { $("#productname").val(""); $("#introdate").val(""); $("#url").val(""); } Delete a Product
Once you've added a few products, y'all'll well-nigh likely need to delete ane or more of those products. Add together a Delete button to each row of the table, as shown in Figure 3. This requires you to alter the <thead> element past adding a new <th> element with the word Delete as shown in the following snippet.
<table id="productTable" class="table table-bordered tabular array-condensed table-striped"> <thead> <tr> <th>Product Name</th> <thursday>Introduction Date</thursday> <th>URL</th> <th>Delete</th> </tr> </thead> </table> 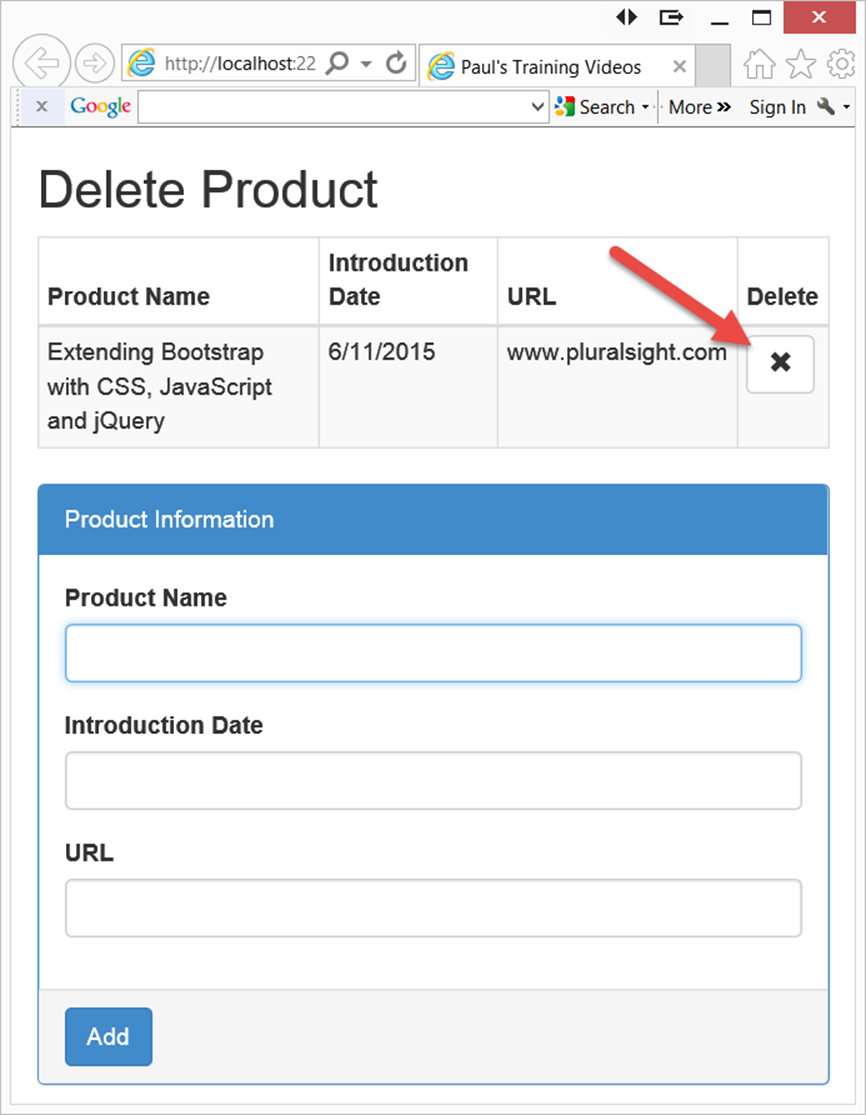
Add together a Delete Push to Each Row
Modify the productAddToTable() part (Listing 4) to include a button command as you add together each row of data. In the JavaScript you write to build the <tr> and the <td> elements, add one more than <td> that includes the definition for a <button> control. This button command uses some Bootstrap classes for styling and a Bootstrap glyphicon to display an "X" to symbolize the delete role (see Figure three). The button also needs its onclick effect to telephone call the function productDelete(). To this office, pass the keyword this, which is a reference to the button itself.
Listing 4: Build a delete button dynamically in your JavaScript code
function productAddToTable() { // First check if a <tbody> tag exists, add together one if not if ($("#productTable tbody").length == 0) { $("#productTable").append("<tbody></tbody>"); } // Append product to the tabular array $("#productTable tbody").append( "<tr>" + "<td>" + $("#productname").val() + "</td>" + "<td>" + $("#introdate").val() + "</td>" + "<td>" + $("#url").val() + "</td>" + "<td>" + "<push button type='button' onclick='productDelete(this);' form='btn btn-default'>" + "<span form='glyphicon glyphicon-remove' />" + "</button>" + "</td>" + "</tr>"); } Delete a Row
The deleteProduct() function accepts the parameter that's a reference to the delete button. From this control, y'all can use the jQuery role parents() to locate the buttons containing <tr> tag. Once you locate the <tr> tag, utilise the remove() office to eliminate that row from the table, equally shown in the following code:
function productDelete(ctl) { $(ctl).parents("tr").remove(); } Edit a Production
You lot've learned how to add and delete rows from an HTML table. At present, turn your attending to editing rows in an HTML table. Just similar y'all added a Delete button to each row in your table, add an Edit button as well (Effigy iv). Once more, you lot need to modify the <thead> element by adding a new <th> element with the word Edit, equally shown in the following lawmaking snippet.
<table id="productTable" course="table table-bordered table-condensed table-striped"> <thead> <tr> <thursday>Edit</th> <th>Product Name</thursday> <thursday>Introduction Date</thursday> <th>URL</th> <th>Delete</th> </tr> </thead> </tabular array> 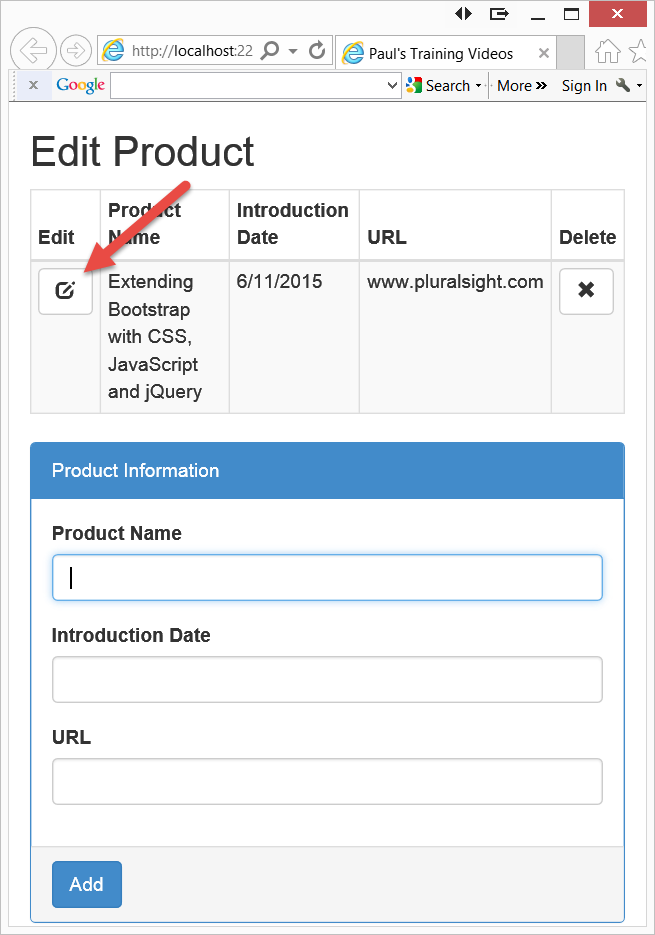
Adding a Row with an Edit Button
Just similar yous built a button in JavaScript for deleting a row, yous build a button for editing also (List v). The onclick event calls a function named productDisplay(). You'll pass in the keyword this to the productDisplay() function and so you tin reference the edit button and thus retrieve the row of information in which this button is located.
Listing 5: Build an Edit push button in JavaScript
function productBuildTableRow() { var ret = "<tr>" + "<td>" + "<push button type='button' onclick='productDisplay(this);' course='btn btn-default'>" + "<span class='glyphicon glyphicon-edit' />" + "</push>" + "</td>" + "<td>" + $("#productname").val() + "</td>" + "<td>" + $("#introdate").val() + "</td>" + "<td>" + $("#url").val() + "</td>" + "<td>" + "<button blazon='push button' onclick='productDelete(this);' course='btn btn-default'>" + "<span grade='glyphicon glyphicon-remove' />" + "</button>" + "</td>" + "</tr>" return ret; } Display Data in Input Fields
When the user clicks on the Edit button in the table, store the current row of the tabular array in a global variable. Ascertain a variable called _row inside the <script> tag but outside of whatsoever function, so it's available to any role within this page.
<script> // Current product existence edited var _row = null; </script> In Listing 5, this was passed into the productDisplay() function from the onclick event of the button. This is a reference to the Edit push control. Write the productDisplay() function to calculate the current row by getting the <tr> tag that's the parent for the Edit button. This is achieved using the following jQuery selector.
_row = $(ctl).parents("tr"); Retrieve all the <td> columns in an array from the current row using the children() function of the _row variable.
var cols = _row.children("td"); Apply the appropriate columns in the table to retrieve each input field, such equally product name, introduction appointment, and URL. The val() function is used to place the data into each text box from each column of data. Finally, and then you know that you're in Edit way every bit opposed to Add manner, modify the text of the updateButton to Update. The complete productDisplay() function is shown in the post-obit code.
function productDisplay(ctl) { _row = $(ctl).parents("tr"); var cols = _row.children("td"); $("#productname").val($(cols[i]).text()); $("#introdate").val($(cols[2]).text()); $("#url").val($(cols[3]).text()); // Alter Update Push button Text $("#updateButton").text("Update"); } Updating the Data
When the user clicks on the updateButton, the productUpdate() function is called. What the text is in the updateButton determines whether or non yous're adding a row of data to the tabular array or editing an existing i. Remember, when yous click on the Edit push, information technology changes the text of the Update button. Alter the productUpdate() function to check the text in the updateButton and perform the appropriate function based on that text, as shown in the following code.
role productUpdate() { if ($("#updateButton").text() == "Update") { productUpdateInTable(); } else { productAddToTable(); } // Clear form fields formClear(); // Focus to product name field $("#productname").focus(); } In that location are a couple of ways yous can update a production. You already saved the row in the _row variable, so you can reference each cell individually in that row and update each cell in the table using the val() part of each input field. Another method is to add the changed data to the row immediately after the current row, then delete the electric current row from the table. I've called to use the latter, as this allows me to reuse the productBuildTableRow() function written before. The last matter to do is to clear the input fields, and change the text back to Add on the Update button. The updating of the product table is shown in the lawmaking below.
function productUpdateInTable() { // Add changed product to table $(_row).after(productBuildTableRow()); // Remove old product row $(_row).remove(); // Clear form fields formClear(); // Change Update Button Text $("#updateButton").text("Add"); } Use Data Dash Attributes
In this article, I've been concentrating on working with client-side code. At some point, y'all are going to take to ship the information back to the server and remember data from it too. Most of the states assign a principal fundamental (unique number) to each row of data. Permit'south now modify the page to use information- attributes to keep track of primary keys on the rows of data in the HTML page.
Add Ii Variables
You demand to create two new global variables in your HTML page; _nextId and _activeId. These are used to go along rails of the next ID to assign a new added row and to keep track of the current ID of the row you're editing. The code to do this is shown below.
<script> // Next ID for adding a new Product var _nextId = i; // ID of Product currently editing var _activeId = 0; </script> You tin can delete the _row variable that you created earlier, as yous're now going to use these ID variables to keep track of which row is beingness added or edited.
Building a Row for the Tabular array
These 2 new variables are used to build the row to add or update in your HTML table. Let'due south change the productBuildTableRow() function (List 6) to accept a parameter called id to which you pass either of those two variables. This unique number is added into a information- attribute on both the Edit and the Delete buttons.
Listing vi: Utilize information- attributes to concur the primary key for each row
office productBuildTableRow(id) { var ret = "<tr>" + "<td>" + "<button type='push' onclick='productDisplay(this);' class='btn btn-default' data-id='" + id + "'>" + "<span class='glyphicon glyphicon-edit' />" + "</button>" + "</td>" + "<td>" + $("#productname").val() + "</td>" + "<td>" + $("#introdate").val() + "</td>" + "<td>" + $("#url").val() + "</td>" + "<td>" + "<button blazon='push button' onclick='productDelete(this);' class='btn btn-default' data-id='" + id + "'>" + "<bridge class='glyphicon glyphicon-remove' />" + "</button>" + "</td>" + "</tr>" render ret; } Getting the Current ID
When the user clicks on the Edit button in the table, call the productDisplay() function passing in the Edit push button. Extract the data- attribute containing the unique ID and assign information technology to the _activeId variable, as shown in the following code.
function productDisplay(ctl) { var row = $(ctl).parents("tr"); var cols = row.children("td"); _activeId = $($(cols[0]).children("button")[0]).data("id"); $("#productname").val($(cols[1]).text()); $("#introdate").val($(cols[2]).text()); $("#url").val($(cols[three]).text()); // Change Update Button Text $("#updateButton").text("Update"); } Since the Edit button is in the beginning column of the row clicked on, think the ID from that button using this line of lawmaking from the in a higher place code snippet.
_activeId = $($(cols[0]). children("button")[0]).data("id"); The jQuery .data() role is passed the suffix of the information- attribute to retrieve. Because yous used data-id as the central for your data- attribute, you lot simply pass id to the .data() function and it returns the value assigned to that attribute.
Update a Row
When the user clicks on the updateButton, the productUpdate() function is still called. However, y'all need to modify this function to use the _activeId variable and pass that value to the productUpdateInTable() function you wrote earlier.
function productUpdate() { if ($("#updateButton").text() == "Update") { productUpdateInTable(_activeId); } else { productAddToTable(); } // Clear form fields formClear(); // Focus to production name field $("#productname").focus(); } Change the productUpdateInTable() function to notice the row in the table that contains this unique ID. This part uses that ID to locate the push button that contains the data- attribute within your tabular array. The code snippet below shows merely the inverse lines in this updated function.
function productUpdateInTable(id) { // Observe Product in <table> var row = $("#productTable button[data-id='" + id + "']") .parents("tr")[0]; // Add changed product to table $(row).later(productBuildTableRow(id)); // Remove original production $(row).remove(); ... } The jQuery selector uses the ID parameter passed into this function. So the selector might await like $("#productTable push[information-id='ii']). This selector returns the unique row in the table for the product that has a push button with a data-id equal to ii. In one case yous locate the row, replace that row in the table with the contents that the user entered in the input fields on this course.
Adding a New Row
Each time you add a new row to the table, place the value in the _nextId variable into the data- attributes for the new row. Change the productAddToTable() function as shown beneath.
function productAddToTable() { // Does tbody tag exist? add i if not if ($("#productTable tbody").length == 0) { $("#productTable").append("<tbody></tbody>"); } // Append product to table $("#productTable tbody").append(productBuildTableRow(_nextId)); // Increment side by side ID to utilize _nextId += 1; } Notice how you pass the _nextId variable to the productBuildTableRow() function. After this new product row is created, increase the _nextId variable then that the next product yous add gets the next unique ID.
Summary
In this commodity, yous learned to create Add together, Edit, and Delete rows in an HTML table using JavaScript and jQuery. Having these skills makes your Spider web pages more responsive and leads you to the adjacent footstep, which is to utilise the Web API to ship the modified data back to the server. In fact, in my next article (Grime in HTML, JavaScript, and jQuery Using the Spider web API) this is exactly what you'll learn to do. The squeamish affair about using these techniques is that you lot don't have to postal service back the complete page and take the complete page redrawn just to go new records or change records. You simply send the data back and forth and redraw those portions of the page that take changed. This saves fourth dimension and transfers less information across the Internet. This is very important on mobile devices that may not be connected to WiFi, as yous don't want to use your users' information minutes transferring a lot of the same HTML when all you need is simply a little scrap of information.
Source: https://www.codemag.com/Article/1511031/CRUD-in-HTML-JavaScript-and-jQuery
0 Response to "How to Upload a Table to a Website"
Post a Comment